r Photo by Marcel Strauß on Unsplash
Introduction
In the world of commercial software development, we often require three working environments: production, staging, and development. While manually deploying code to each of these spaces isn't terribly complicated, it's a task we can make much easier with GitHub Actions.
By automating deployments with Github Actions we not only simplify the deployment process but also add a layer of security by keeping sensitive environment data, like AWS and database credentials, safe within secure locations, like GitHub Secrets. This means our developers can work on projects without exposing confidential information on their local machines.
In this article, we'll walk through the process of setting up a backend API using Node.js and the Serverless Framework. Additionally, we'll introduce a GitHub Actions workflow to automate the deployment of our code to different AWS environments based on repository events.
Github Repository
If you'd rather skip straight to the code, here is the Github Repo.
Prerequisites
To get started, you'll need the following:
- Your own AWS account (the Free Tier will suffice).
- An AWS IAM user with programmatic access (you'll use the access and secret keys later).
- Lastly, make sure you have Node.js and npm installed on your local machine.
Contents
- Install the Serverless CLI
- Create a Service
- Create a Repo and Push to Github
- Create environment branches
- Configuring the Service
- Understanding the serverless.yml File
- Create env files and variables
- Deploying the Service to the 'dev' Environment
- Adding a Github Actions Workflow
- Testing the Workflow
- Add env vars to Github Secrets
- Workflow Successfully Deployed
- Conclusion
Install the Serverless CLI
Our first step is to ensure that the Serverless Framework CLI is installed on your local machine. To do this, open a terminal window and enter the following command (you may need administrative permissions):
npm install -g serverless
To confirm a successful installation, check the framework version by running:
❯ serverless -v
Framework Core: 3.35.2
Plugin: 7.0.3
SDK: 4.4.0
Create a Service
Next, let's establish a project to serve as our foundation, commonly referred to as a 'service':
-
Begin in your local machine's home directory (I'm using macOS as an example).
-
Create a new directory where you'll house all your serverless projects, then navigate into that directory:
❯ mkdir serverless-projects && cd serverless-projects
~/serverless-projects
- Now, execute the
serverlesscommand. This will launch a command-line wizard that will guide you through a series of questions and prompts to configure your project:
❯ serverless

Creating a new serverless project

? What do you want to make?
  AWS - Node.js - Starter
❯ AWS - Node.js - HTTP API
  AWS - Node.js - Scheduled Task
...
- The wizard offers you some templates to choose from. Use the arrow keys to navigate to
AWS - Node.js - HTTP APIand pressEnter:
? What do you want to make? AWS - Node.js - HTTP API
- Give your project a name; let’s call it
serverless-ci-cd:
? What do you want to call this project? serverless-ci-cd

✔ Project successfully created in serverless-ci-cd❯ cd serverless-ci-cd
~/serverless-projects/serverless-ci-cd folder
- Decline registration/login by typing
nand pressEnter:
? Register or Login to Serverless Framework No
- Decline immediate deployment by typing
nand pressEnter:
? Do you want to deploy now? No
- Finally, navigate into the root directory of your project and list the files to confirm the setup:
❯ cd serverless-ci-cd
❯ ls -la
total 32
drwxr-xr-x  6 {your-username}  {group}   192 26 Sep 09:34 .
drwxr-xr-x  5 {your-username}  {group}   160 26 Sep 09:34 ..
-rw-r--r--  1 {your-username}  {group}    86 26 Sep 09:34 .gitignore
-rw-r--r--  1 {your-username}  {group}  2886 26 Sep 09:34 README.md
-rw-r--r--  1 {your-username}  {group}   253 26 Sep 09:34 index.js
-rw-r--r--  1 {your-username}  {group}   208 26 Sep 09:34 serverless.yml
~/serverless-projects/serverless-ci-cd
Create a Repo and Push to Github
Now, let's establish a GitHub repository as the remote 'home' for our serverless-ci-cd service.
-
Start by creating a GitHub repository in your GitHub account. Give it the same name as your local directory;
serverless-ci-cd. If you're unsure how to create a repository, you can find step-by-step instructions here. -
As a precaution, make the repository private for now, especially if you're concerned about accidentally exposing any credentials or sensitive information.
-
Once the repository is created, GitHub provides a set of instructions for making your initial commit and pushing the code to the repository. However, since we already have the template files in place from the Serverless setup, we can adjust the steps as follows:
git init
git add .
git commit -m "first commit"
git branch -M main
git remote add origin git@github.com:{your-github-username)/serverless-ci-cd.git
git push -u origin main
Create environment branches
Now, let's set up the branches that will represent different environments for our service. We already have a main branch, which serves as our production environment. To create branches for development and staging follow these steps:
- If you're not already there, start from the
mainbranch, our primary branch for production:
❯ git checkout main
- Create the
staginganddevelopmentbranches:
❯ git branch staging
❯ git branch development
- Confirm the new branches have been created:
❯ git branch -a
You should see something like this:
  development
* main
  staging
  remotes/origin/main
- Push the newly created
developmentandstagingbranches to the remote repository. Run the following command separately for each branch:
git push origin -u {branch-name}
For example, to push the staging branch:
❯ git push origin -u staging
You'll receive confirmation that the branch has been set up to track origin/staging.
- Finally, run
git branch -aagain to confirm that these branches now exist on the remote repository:
❯ git branch -a
  development
* main
  staging
  remotes/origin/development
  remotes/origin/main
  remotes/origin/staging
You should now see the branches on the remote repository, indicated by remotes/origin/development and remotes/origin/staging. These branches will serve as distinct environments for your project, allowing you to develop, test, and deploy with confidence.
Configuring the Service
Up to this point, we have our local and remote repositories set up with a basic template from the Serverless Framework. Now, let's configure the serverless.yml file to ensure a seamless deployment to AWS.
- First, switch to the
developmentbranch of your project:
❯ git checkout development
You should see a message indicating that you've switched to the 'development' branch:
Switched to branch 'development'
Your branch is up to date with 'origin/development'.
~/serverless-projects/serverless-ci-cd development
- Open your code editor then copy and paste the following configuration into the
serverless.ymlfile:
service: serverless-ci-cd
frameworkVersion: '3'

useDotenv: true

custom:
  stage: ${opt:stage, 'dev'}
  dotenv:
    dotenv_path: .env.${self:custom.stage}

provider:
  name: aws
  runtime: nodejs18.x
  stage: ${self:custom.stage}
  profile: ${env:AWS_PROFILE}
  region: ap-southeast-2
  environment:
    DB_HOST: ${env:DB_HOST}

functions:
  api:
    handler: index.handler
    events:
      - httpApi:
          path: /
          method: get
This configuration defines our entire service in the cloud. Before we dive into the details, let's consider the serverless command that we'll use for deploying the service:
npx serverless deploy --stage dev
The crucial part of this command is the --stage option and its following value. It informs the Serverless Framework that we intend to deploy to the dev environment. If we were to change this value to staging or prod, we would be instructing it to deploy to those respective environments.
This configuration file sets the stage for our AWS deployment and allows us to specify different environment variables, such as the database host (DB_HOST), for each stage. It's a pivotal step in ensuring that your service deploys successfully to the desired environment.
Understanding the serverless.yml File
Now, let's take a closer look at the serverless.yml configuration file:
service and frameworkVersion
These properties are quite straightforward. service defines the name of our service, while frameworkVersion specifies the version of the Serverless Framework we're using.
useDotenv
The useDotenv property is particularly important. When set to true, it enables the framework to utilize the dotenv package, which allows access to local environment variables. These variables can be stored either in an .env file or in Github Secrets, which we'll explore shortly.
custom, provider, and functions
These are key sections within the configuration file.
custom: In the custom section, we define properties specific to our project. Here, we set the stage property, which defaults to dev if not provided as an option during deployment. Additionally, we specify the dotenv_path for handling environment variables based on the selected stage.
provider: Under the provider section, we configure the cloud provider using name, in this case, AWS. We specify details like the runtime environment, stage, AWS profile, AWS region, and environment variables for the AWS Lambda functions. The DB_HOST environment variable, for instance, is retrieved from your local environment or Github Secrets.
functions: This section defines the functions in your service. In our case, we have an api function with its respective configuration, including the handler function and an HTTP API event that maps to a specific route and HTTP method.
Variable Referencing Simplified
In the custom and provider sections we use a technique called variable referencing. For instance, the stage property in the custom section is set as ${opt:stage, 'dev'}, which means it looks for the value passed to the --stage option when the serverless deploy command is executed. Therefore, if we run npx serverless deploy --stage dev, it captures dev as the stage value. Without the --stage option, it implements a fallback value of dev.
Similarly, in the dotenv_path, we use ${self:custom.stage} to get dev. The :self syntax allows us to reference any property with the serverless.yml file using dot notation. Combined with the rest of the dotenv_path, the resulting value becomes .env.dev. This dynamic method helps Serverless locate the right environment variable file based on the --stage value, creating a highly flexible configuration.
The use of variable referencing is continued in the provider section for the stage, profile and DB_HOST properties.
AWS IAM user profile
The AWS user profile created for this project must have the following policies in place:
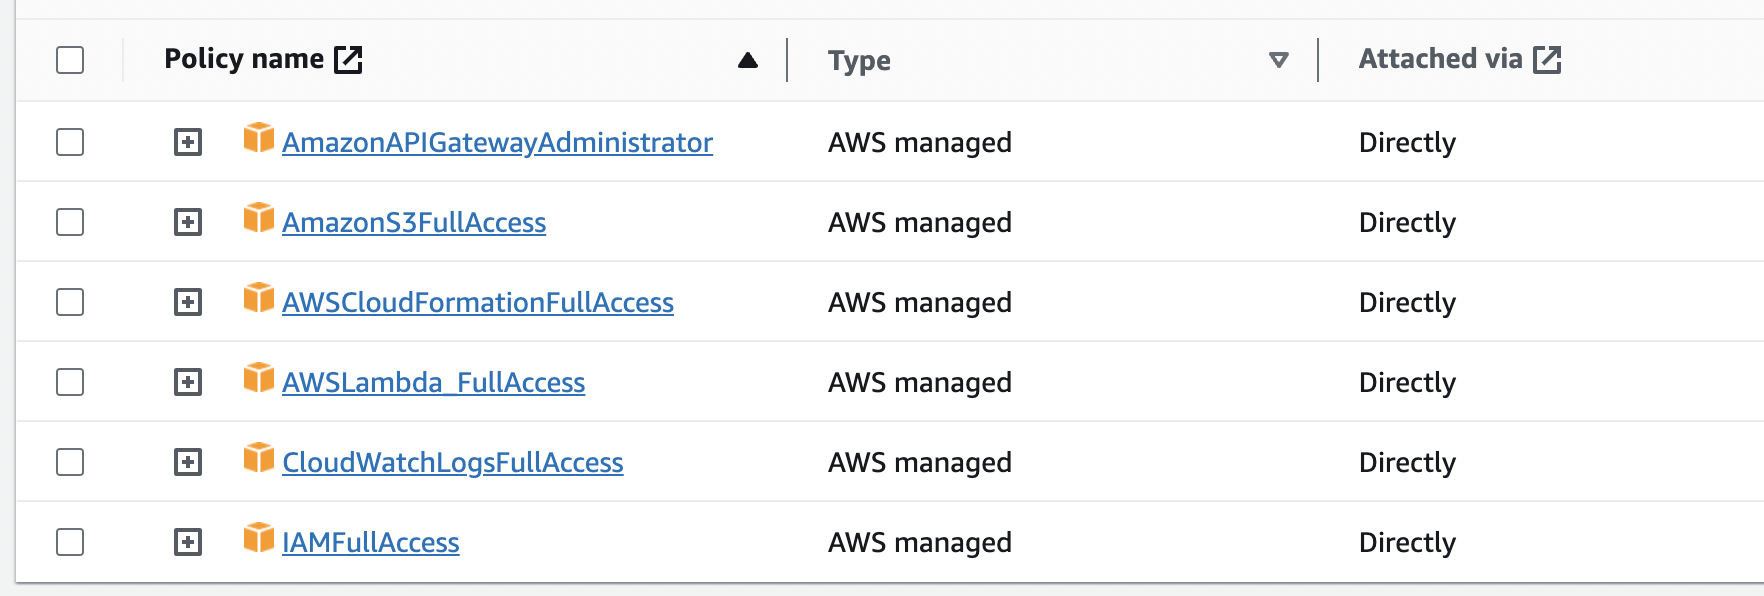
Please note, the above is a very permissive policy allocation. In a working environment it would be best to follow the ‘principle of least privilege’ and specify more restrictive policies.
Create env files and variables
To ensure a successful deployment, we need to setup the DB_HOST and AWS_PROFILE environment variables. However, note that DB_HOST won't be used for database access but rather to demonstrate the deployment to different AWS environments. It showcases how your code can adapt to access various resources in each environment, such as development, staging, or production databases.
- In your project root, create three environment files, one for each environment:
❯ touch .env.staging .env.dev .env.prod
- In each file, include the
AWS_PROFILEvariable with the same user profile name and theDB_HOSTvariable with a value indicating the environment. For example, in the.env.devfile:
AWS_PROFILE=serverless-test-user
DB_HOST=dev-database-host
- Update your
.gitignorefile to prevent these environment files from being committed to the repository:
...

# env files
.env*
Now, the relevant environment variables will be accessible locally to your serverless.yml file based on the --stage value provided during the serverless deploy command. This means that the DB_HOST variable will have a different value in each AWS environment. To verify this in AWS, make a slight modification to your index.js file:
module.exports.handler = async (event) => {
const stage = process.env?.DB_HOST.split('-')[0];
const message = `This endpoint will access the ${stage} database.`;

  return {
    statusCode: 200,
    body: JSON.stringify(
      { message },
      null,
      2
    ),
  };
};
This code ensures that your endpoint responds with a message indicating the database it theoretically accesses based on the DB_HOST value. While this might seem detailed, it's done to avoid revealing environment variables to the public, which is considered bad practice.
Since each DB_HOST value starts with the environment name (e.g., staging-database-host), we use string manipulation to split the value based on the hypens and return the first element of the resulting array, giving us the stage name.
Deploying the Service to the 'dev' Environment
To ensure our setup works, let's start by deploying the service from our local machine to the dev environment in AWS.
- Configure your AWS user profile using the command line. This requires your user profile's access and secret keys, your deployment region, and the AWS CLI installed, Use the following command, replacing
serverless-test-userwith your AWS user's profile name:
$ aws configure --profile serverless-test-user
AWS Access Key ID [None]: {ACCESSKEY}
AWS Secret Access Key [None]: {SECRETKEY}
Default region name [None]: {REGIONNAME}
Default output format [None]: json
- In your project root directory, execute the deploy command for the
devenvironment:
npx serverless deploy --stage dev
You'll receive output similar to this:
❯ npx serverless deploy --stage dev

Deploying serverless-ci-cd to stage dev (ap-southeast-2)

✔ Service deployed to stack serverless-ci-cd-dev (99s)

endpoint: GET - https://343buialkg.execute-api.ap-southeast-2.amazonaws.com/
functions:
  api: serverless-ci-cd-dev-api (1.7 kB)
Congratulations! Your service has been successfully deployed. You can call your endpoint using curl, and the returned message confirms that the DB_HOST value theoretically provides access to the development database:
❯ curl https://58u9a1pnb4.execute-api.ap-southeast-2.amazonaws.com/
{
  "message": "This endpoint will access the dev database."
}
Adding a Github Actions Workflow
Now that we’re confident our configuration will deploy from our local machine to our AWS dev environment, let's set up a Github Actions workflow to automate deployments to our staging environment on Github whenever we merge changes into the staging branch.
- Create a
.github/workflowsdirectory in your project (use the-pflag to create multiple directories)
mkdir -p .github/workflows
- Next, create the workflow file
deploy-to-staging.ymlwithin the.github/workflowsdirectory:
touch .github/workflows/deploy-to-staging.yml
- In your code editor, copy and paste the following content into the new
deploy-to-staging.ymlworkflow file:
name: Deploy to Staging

on:
  pull_request:
    types:
      - closed
    branches:
      - staging

jobs:
  deployToStaging:
    if: github.event.pull_request.merged == true
    runs-on: ubuntu-latest
    env:
      DB_HOST: ${{ secrets.DB_HOST_STAGING }}
      AWS_PROFILE: ${{ secrets.AWS_PROFILE }}
      AWS_ACCESS_KEY_ID: ${{ secrets.AWS_ACCESS_KEY_ID }}
      AWS_SECRET_ACCESS_KEY: ${{ secrets.AWS_SECRET_ACCESS_KEY }}

    steps:
      - name: Checkout code
        uses: actions/checkout@v2

      - name: Set up Node.js
        uses: actions/setup-node@v2
        with:
          node-version: 18

      - name: Configure AWS credentials
        run: |
          aws configure set aws_access_key_id $AWS_ACCESS_KEY_ID --profile $AWS_PROFILE
          aws configure set aws_secret_access_key $AWS_SECRET_ACCESS_KEY --profile $AWS_PROFILE
          aws configure set region ap-southeast-2
          aws configure set output json

      - name: Install serverless
        run: npm install -g serverless

      - name: Deploy to Staging
        run: npx serverless deploy --stage staging
Workflow Explained:
The deploy-to-staging.yml file is our Github Actions workflow, a set of configurations that trigger specific 'jobs' based on events within the repository.
We have implemented 3 of the possible workflow properties: name, on and jobs.
name: Used to provide a name for our workflow, which appears in the 'Actions' tab on Github.
on: This defines when the workflow should run. In our case, it triggers when a pull_request is closed on the staging branch. The closed event is used because it's triggered when a pull_request is merged (github docs).
jobs: Here we define a single job named deployToStaging.
The deployToStaging Job Explained
- Firstly we use an if condition to ensure the workflow only runs after the pull request is fully merged.
- Next, We specify that Github should run this job on an
ubuntu-latestmachine instance. - We set up environment variables using the
envproperty, pulling values from Github Secrets. - In the steps section, we define each task in the job.
Let’s go through each task by their name values:
Checkout code: This task makes use of a predefined unit of code named actions/checkout@v2. This is a Github action that clones our repo into a directory on the ubuntu instance and checks out the staging branch (due to the staging branch trigger we have set in the on property).
Set up Node.js: installs Node version 18 using another predefined Github action, this time actions/setup-node@v2
Configure AWS credentials: Here, we use the Github Secrets-based environment variables to configure our AWS profile, allowing authentication for deployment to AWS (similar to running aws configure --profile serverless-test-user on your local machine and providing acess/secret keys/etc)
Install serverless: This step installs the Serverless Framework on the instance.
Deploy to Staging: The final task runs the npx serverless deploy --stage staging command to deploy the service to the staging environment.
Testing the workflow
Before adding environment variables to Github Secrets, we'll test our workflow to understand how it will react without them in place.
Follow these steps:
- You should be on your
developmentbranch so, if not done already, commit your changes and push to the remote repo:
❯ git add .
❯ git commit -m "project ready for deployment"
❯ git push
- In your Github repository, go to the "Pull Requests" tab.

-
If the development branch shows recent pushes (as above), select 'Compare & pull request'. Otherwise, choose 'New Pull request'.
-
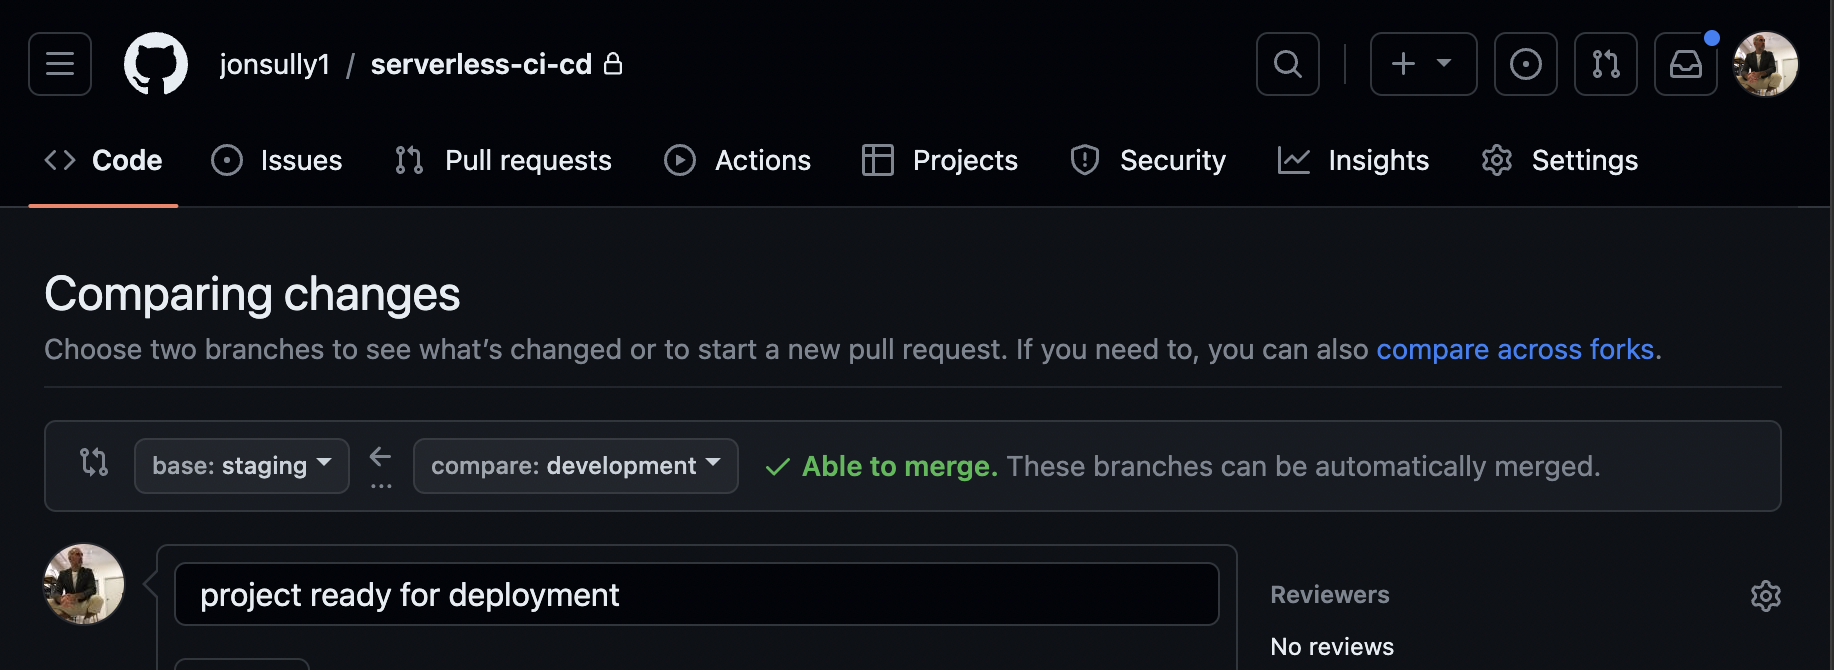
On the next screen, make sure the base branch is set to
stagingand the compare branch isdevelopment. Then, select 'Create pull request':
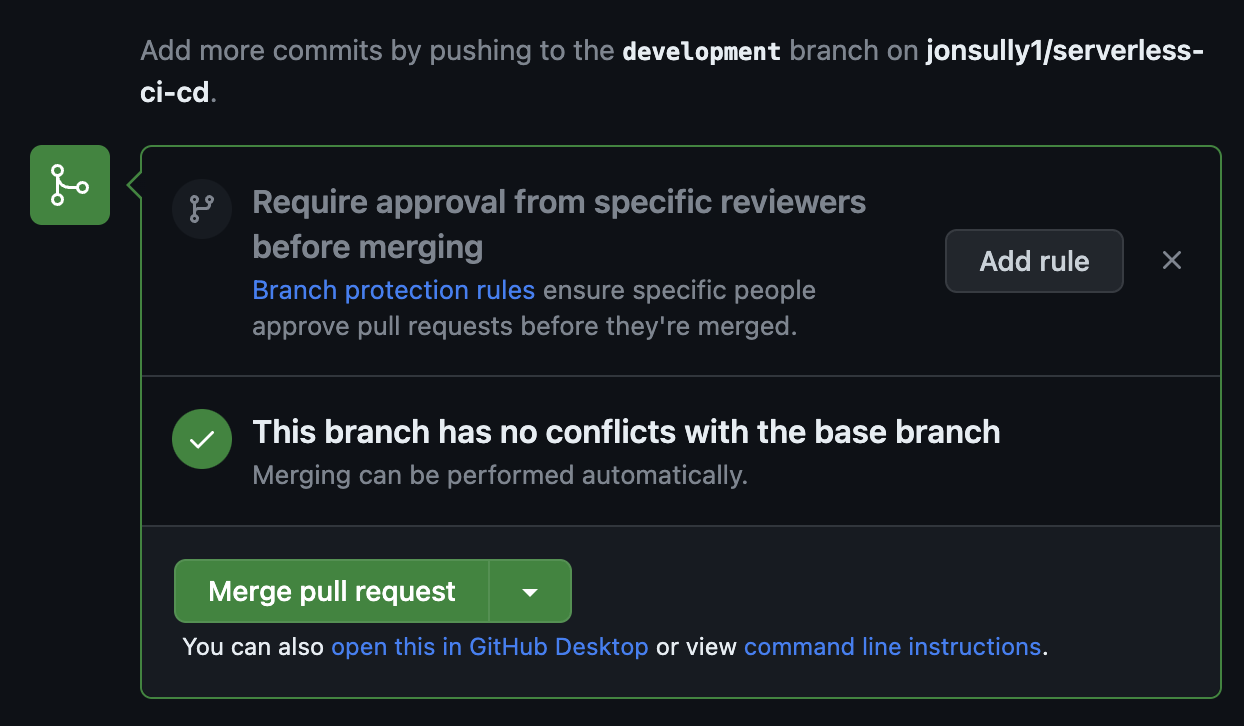
- The branch has no conflicts, we’re clear to merge, so select ‘Merge pull request’:
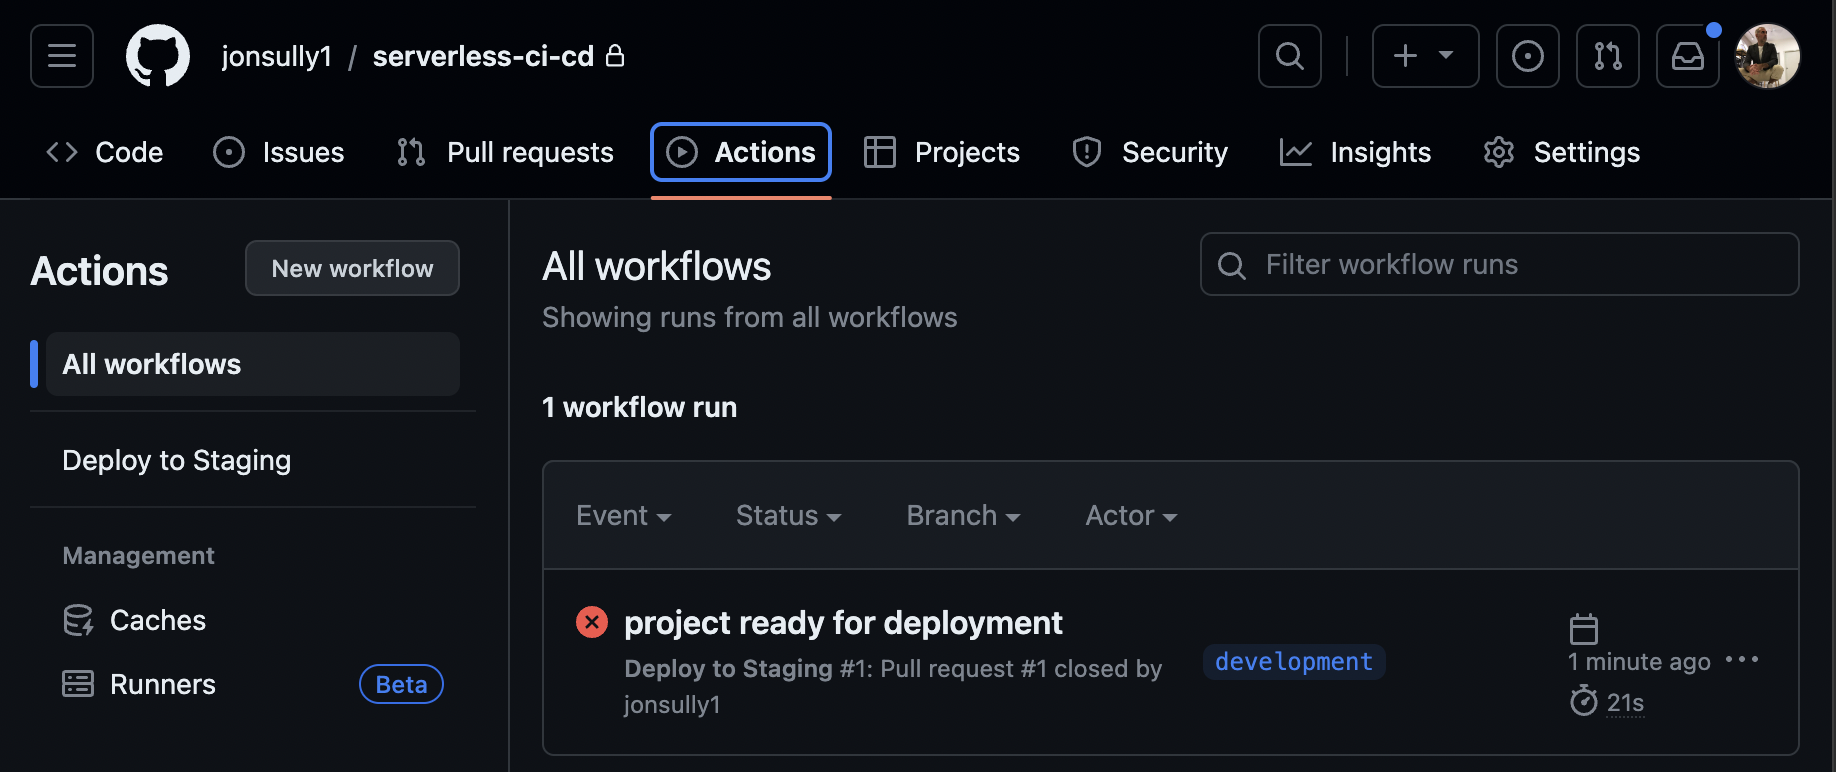
- Navigate to the 'Actions' tab in your repository. You'll see that the workflow has triggered and failed as expected:
- To find out why, inspect the workflow logs. These logs provide details about each task, making it easy to diagnose issues:
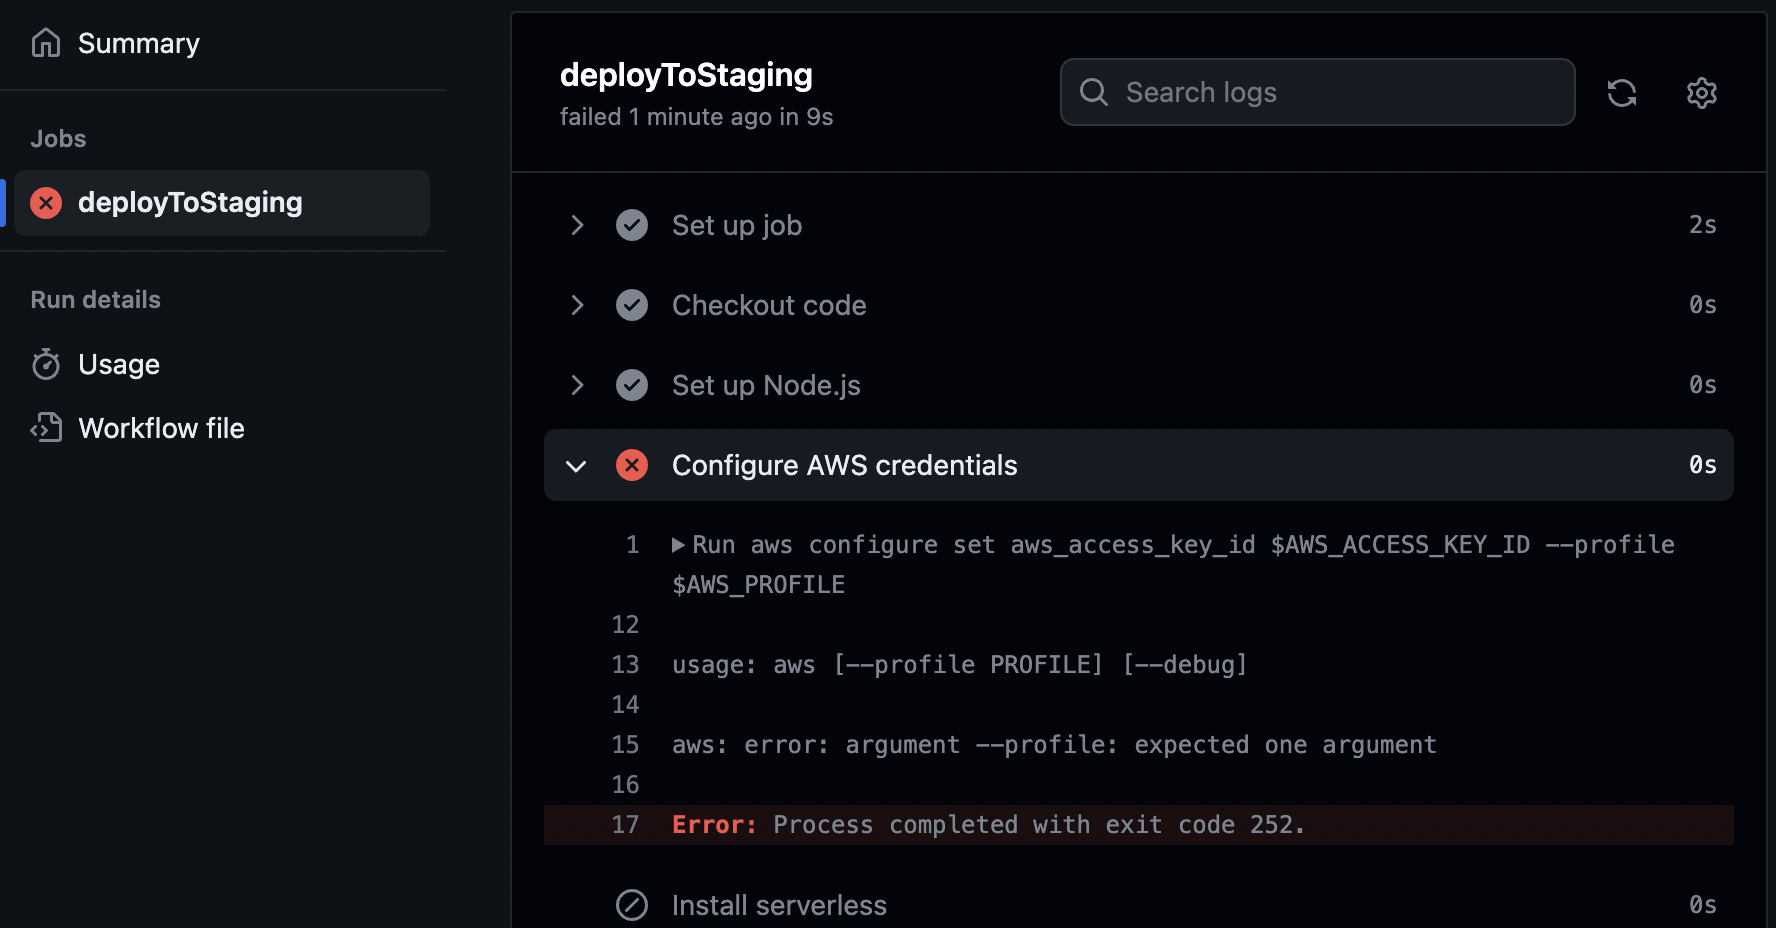
- In this case, you'll notice that the
aws configurecommand failed because the$AWS_PROFILEenvironment variable is empty. This was expected since we haven't added the environment variables to Github Secrets yet.
Add env vars to Github Secrets
Github Secrets works is in a very similar way to the env files we create on our local machine, storing key/value pairs that can be accessed via Github’s own variable reference syntax.
...
  env:
    DB_HOST: ${{ secrets.DB_HOST_STAGING }}
    AWS_PROFILE: ${{ secrets.AWS_PROFILE }}
    AWS_ACCESS_KEY_ID: ${{ secrets.AWS_ACCESS_KEY_ID }}
    AWS_SECRET_ACCESS_KEY: ${{ secrets.AWS_SECRET_ACCESS_KEY }}
...
The above (from deploy-to-staging.yml) extracts the values we need from Github Secrets and stores them in the local environment of the ubuntu instance that runs the workflow.
The environment variables are then used in the Configure AWS credentials task:
  - name: Configure AWS credentials
    run: |
      aws configure set aws_access_key_id $AWS_ACCESS_KEY_ID --profile $AWS_PROFILE
      aws configure set aws_secret_access_key $AWS_SECRET_ACCESS_KEY --profile $AWS_PROFILE
      aws configure set region ap-southeast-2
      aws configure set output json
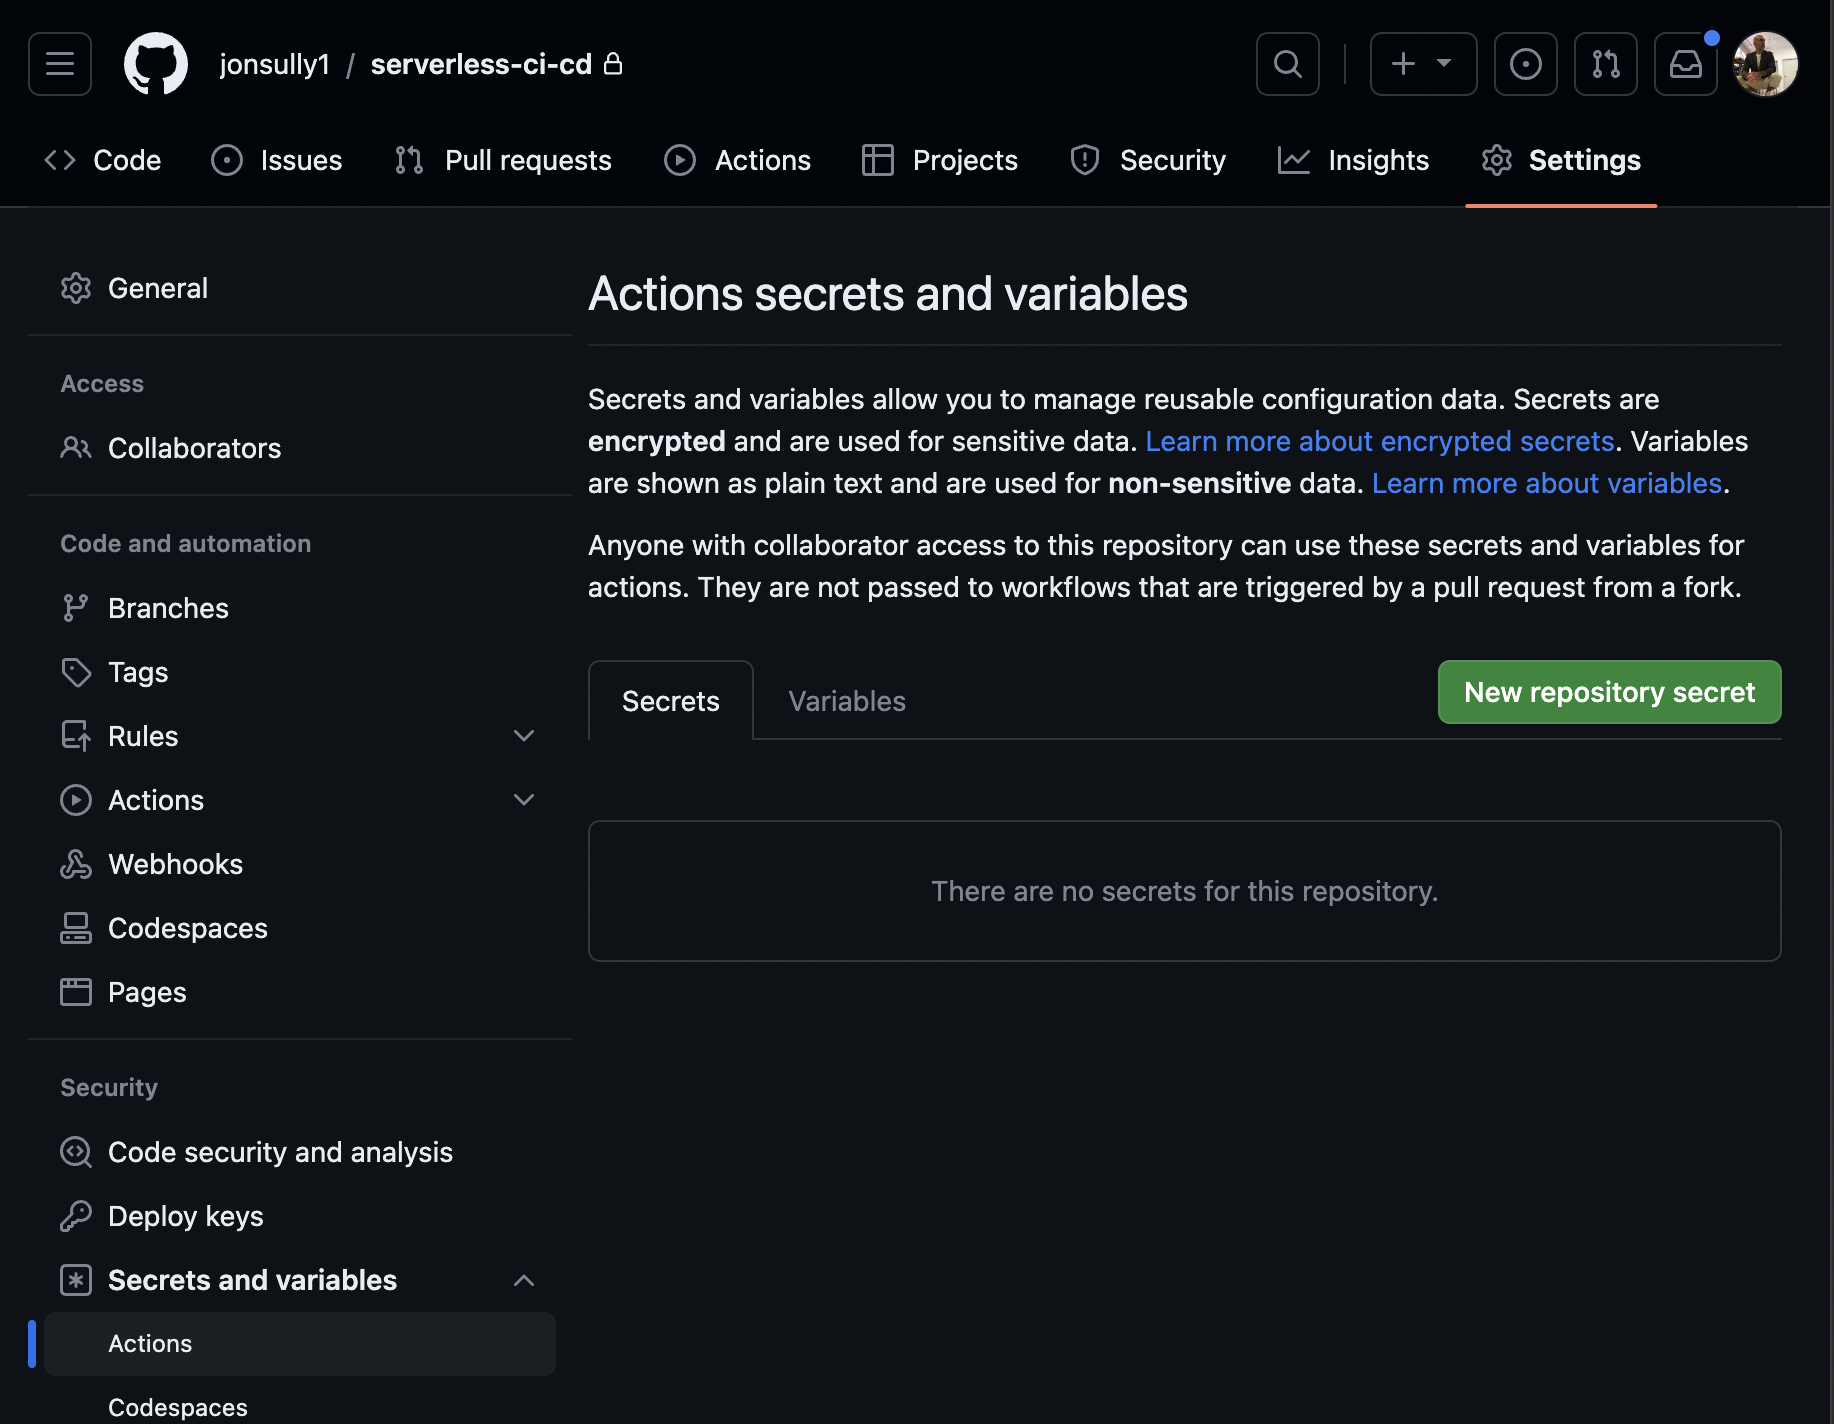
In your Github repository, go to the 'Settings' tab, then in the sidebar menu, navigate to 'Secrets and variables', then select 'Actions':
- Choose 'New repository secret'
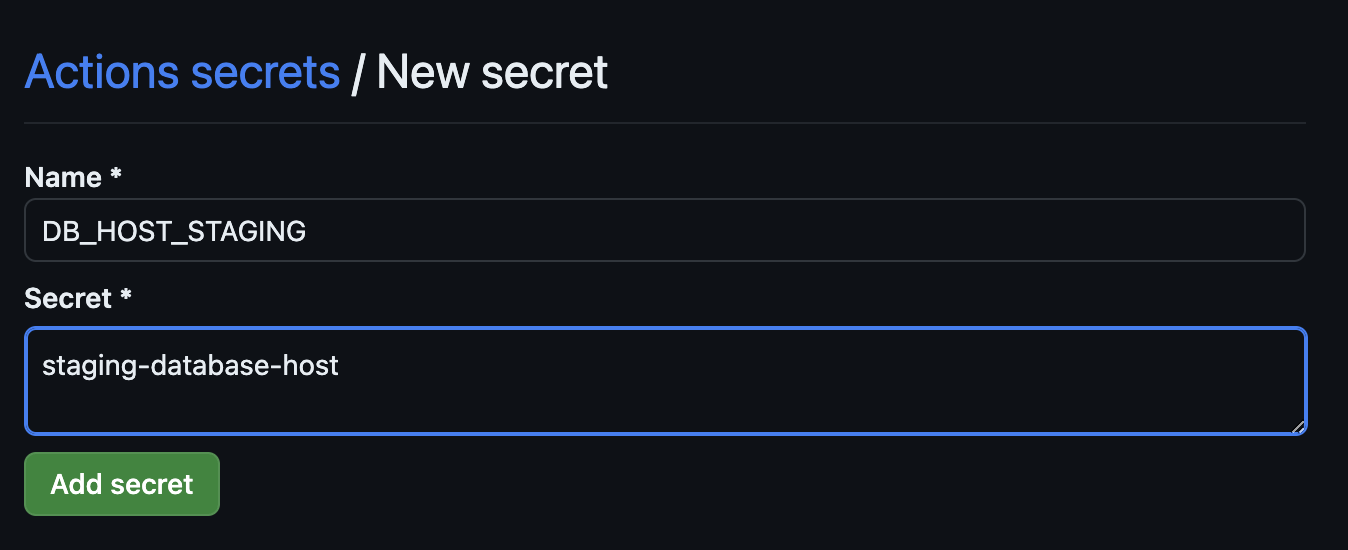
- Enter the name and value, select ‘Add secret’ and repeat for all the environment variables in our workflow, for example:
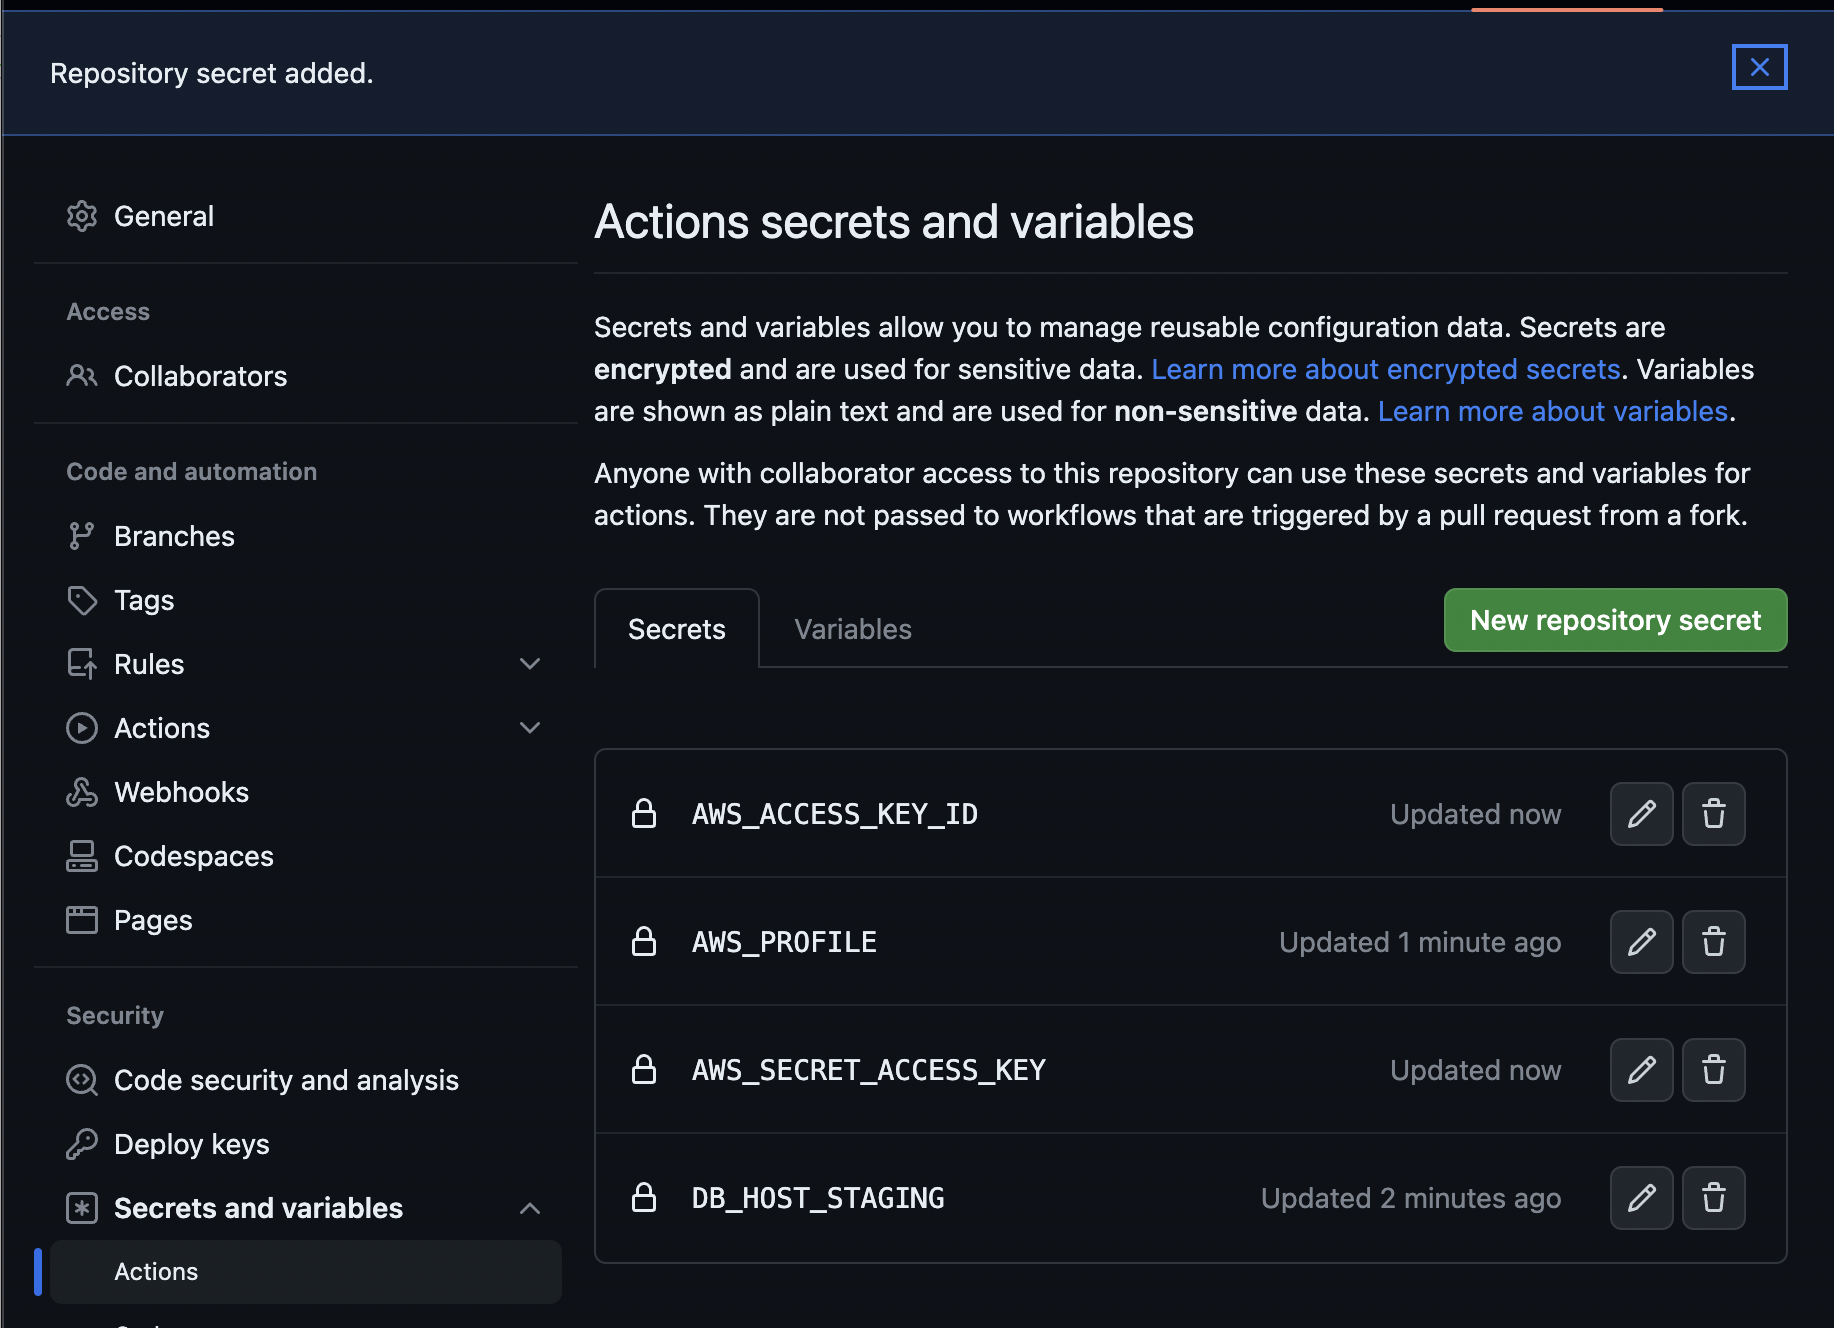
Once all secrets are added, you can either go directly to the 'Actions' tab and re-run the original job, or you can make a small change in your service code, commit, push, and merge to the staging branch to trigger the workflow again. The latter method allows you to test the full expected workflow that would occur in a typical project.
Workflow Successfully Deployed
I took the easy option to re-run the workflow - as I've done this a number of times already!
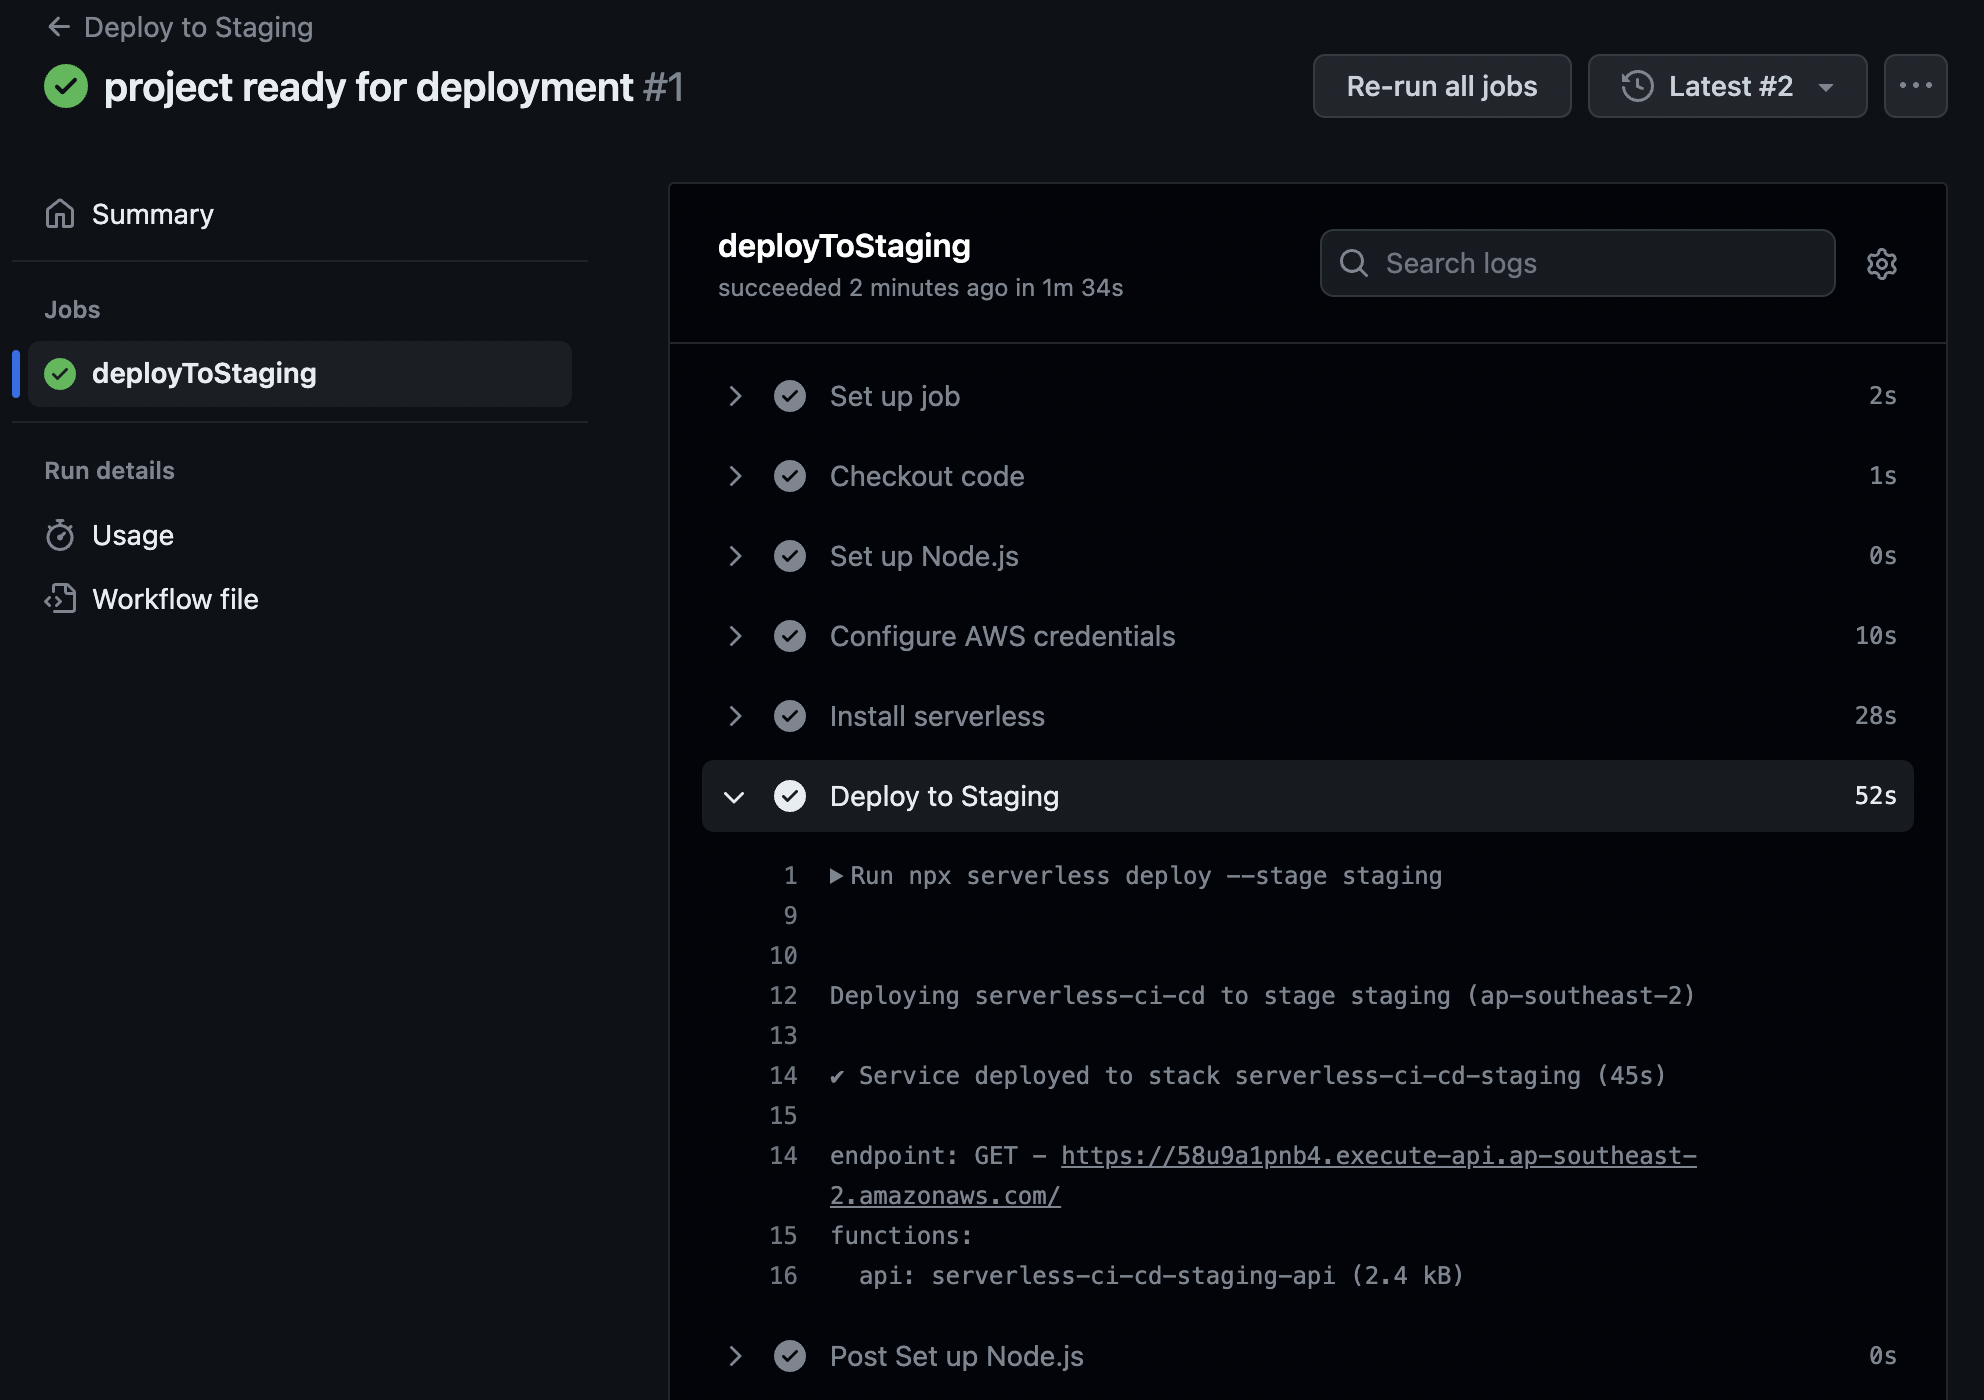
Our workflow succeeded and we can see the endpoint in the logs, note the staging in the stack it was deployed to:
Deploying serverless-ci-cd to stage staging (ap-southeast-2)

✔ Service deployed to stack serverless-ci-cd-staging (45s)

endpoint: GET - https://58u9a1pnb4.execute-api.ap-southeast-2.amazonaws.com/
functions:
  api: serverless-ci-cd-staging-api (2.4 kB)
Let's call this new endpoint from the command line using curl, we should see a change in the message if we have our env vars setup correctly in Github Secrets:
❯ curl https://58u9a1pnb4.execute-api.ap-southeast-2.amazonaws.com/
{
  "message": "This endpoint will access the staging database."
}
This successful deployment confirms that the environment variables are set up to access the desired environment resources (staging in this case).
Conclusion
In summary, this article has detailed the creation of a streamlined deployment workflow for a Node.js backend API using the Serverless Framework and GitHub Actions. We have also outlined the setup of distinct development, staging, and production environments while emphasising the security of sensitive data through GitHub Secrets.
However, there is still the question of test step. A robust CI/CD pipeline would incorporate workflows that run unit/integration/end-to-end tests against the codebase at crucial points of the deployment process, such as pull_request events in to staging and prod branches. We will add to this in the next next article.
By automating the deployment process, we saves time and ensures consistency, paving the way for scalable and reliable project development within teams.